My Digital Scale Reads Offff When I Tare

In this post we are going to acquire about strain gauge based load cell. We will be exploring what Strain Gauge is, what Load Cell is, temperature effect on strain estimate, temperature compensation with Wheatstone bridge and Load jail cell amplifier HX711, and finally we will acquire how to build an Arduino based weighing scale machine by implementing load cell as the weight sensor.
This mail deals with weight measurement and measuring methods, and implementing the methods in an Arduino based weighing calibration circuit.
We all love to see our weight regardless of our age, a pocket-size kid may dear to see his / her weight proceeds and adults may love to see his / her weight loss. Weight is being a vital concept since ancient times; information technology helped in trading goods, development of scientific equipments and commercial products.
In modern times, we measure weights in kilograms, milligrams even micrograms for laboratory purpose. One gram is same across the globe, all weight measuring device must mensurate the aforementioned. The mass production of a pill with tiny difference of few milligrams of dosage is plenty to make a lifesaving pill in to a suicide pill.
What is Weight?
Weight is the strength exerted on a plane. The corporeality of forcefulness exerted is directly proportional to mass of an object, which means college the object'due south mass, the college the force exerted.
Mass is the amount of physical matter nowadays in an object.
The weight depends on one more factor: Gravity.
The gravity is constant across the globe (At that place are pocket-size variation in gravity due to non-uniform spherical shape of the earth, only information technology is very tiny). The weight of 1Kg on world volition weight 160 gram on the moon with exact same mass, because moon has much weaker gravitational pull.
Now you know what is weight and what are the factors brand an object heavy.
What is Strain guess:
The strain gauge is a transducer or a sensor which measures the strain (deformation) on an object. This was invented by electrical engineer Edward E. Simmons and mechanical engineer Arthur Claude Ruge.
Illustration of Strain Approximate:

The Strain estimate is flexible; it is a sparse metallic foil design sandwiched between two thin plastic sheets and it has to be fastened on a surface using suitable glue or whatever adhesive material.
When nosotros apply weight or strength on the surface it deforms and the strain gauge deforms too. The deformation of the strain gauge causes the electric resistance of the metal foil to alter.
Now the strain judge's change in the resistance is directly proportional to weight or practical forcefulness on the surface.
In existent life the modify in resistance of strain guess is very insignificant to observe. To observe tiny changes in the resistance we are utilizing Wheatstone bridge.
Permit's explore what Wheatstone bridge is in a nutshell.
Understanding a Wheatstone bridge:
A wheat stone bridge is a circuit which can exist used for determining unknown resistance. The Wheatstone bridge was devised past Samuel Hunter Christie, after; the Wheatstone bridge was enhanced and disseminated by Sir Charles
Wheatstone.
Illustration of Wheatstone span circuit:

Our modern digital multimeters can read the resistance value ranging from mega ohms, kilo ohms and ohms range.
Using Wheat rock bridge we tin measure resistance in milli ohm range.
The wheat rock bridge consists of iv resistors, out of the four, iii are known resistance and 1 is unknown resistance.
The potential difference (voltage) is practical on the points "A" and "C" and from points "B" and "D" a voltmeter is continued.
If the all the resistors are equal no current will flow at the points "B" and "D" and voltmeter will read zero. This is chosen balanced bridge.
If a resistor'due south resistance is dissimilar from other 3 resistors, there will be voltage menstruum between the points "B" and "D" and voltmeter volition read some value proportional to unknown resistance. This is called unbalanced bridge.
Here the unknown resistance is the strain gauge, when the resistance is changed, it reflects on the voltmeter.
Now, we have converted a deformation or weight or force to voltage signal. This voltage needs to exist amplified in order to go some useful readings, which will be fed to a microcontroller to go the readings in grams.
Now allow's discuss how temperature affects strain gauge performance.
Temperature effects on Strain Gauge:
The strain guess is temperature sensitive and it can mess upwards with actual weight / force readings. When there is a change in ambient temperature the metallic foil is subjected metallic expansion, which directly affects the resistance.
We can nullify the temperature effect using Wheatstone bridge. Let's run across how we can compensate the temperature using the Wheatstone bridge.
Temperature Compensation:
We tin can easily neutralize the temperature effect by replacing all the resistors with strain approximate. Now all the strain gauge's resistance volition be affected by the temperature equally and unwanted noise will be nullified by the Wheatstone bridge's character.
What is a Load Cell?
A Load cell is an aluminium contour with strain gauge attached to iv sides in Wheatstone span configuration.
Illustration of Load cell:
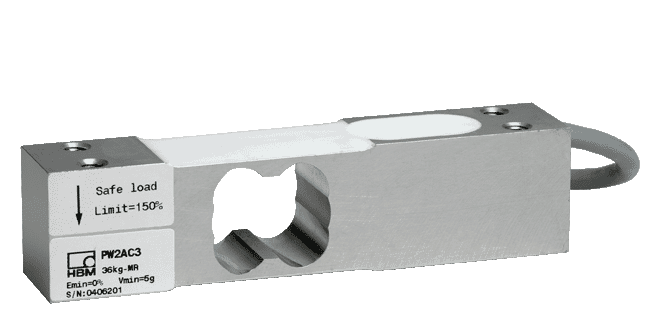
This type of load cell is rigid and used unremarkably in industries. At that place are 4 screw mounts, one side is bolted to a stationary surface and the other end is bolted to a holder (say handbasket) to hold the object to be measured.
It has maximum weight specified on the datasheet or on its torso, exceeding the specification might harm the load cell.
A full bridge cells consists of 4 terminals namely East+, E-, which are excitation wires through which the supply voltage is applied. The other two wires are S+ and S-, which are signal wires, from which the voltage is measured.
Now these voltages are in millivolt range non strong enough for a microcontroller to read and process. Nosotros demand amplification and tiny changes should exist visible to the microcontroller. To exercise this there are dedicated module called load cell amplifiers, permit's take an overview on that.
Load cell Amplifier HX711:
Analogy of HX711 Load prison cell amplifier module:
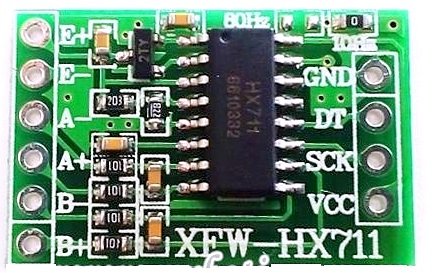
The load cell amplifier is based on the IC HX711 which is 24-fleck analog to digital converter specifically designed for weight measures. It has different selectable gains 32, 64 and 128 and it operates on 2.six to 5.v V.
This breakout board helps to detect tiny variation on load prison cell. This module crave HX711.h library to operate with
Arduino or whatever other microcontrollers.
The load cell will exist connected to HX711 module and the module volition be interfaced with Arduino. The weight measuring circuit needs to be developed in this manner.
In decision, at present you know what strain estimate is, what Wheatstone bridge is, temperature effects on the strain estimate, temperature compensation and what load jail cell amplifier is.
We have comprehensively understood the theoritical part of the a weighing calibration design from the to a higher place discussion, now allow's run into how a loas cell may e used for making a pratical weighing scale machine using Arduino
Designing a Digital Weighing Scale Machine using Arduino
In the following discussions nosotros will larn how to construct a digital weight scale machine using Arduino which can measure weights from few grams to forty Kg (depending on the specs of your load cell) with reasonable accuracy. We volition be learning about nomenclature of precision class load cells and nosotros will be calibrating the proposed circuit and finalizing the weight scale automobile.
Notation: This circuit may non be compliant with the standards required for commercial implementation.
Weight scale machines are used in different varieties of trades and research ranging from milligrams to several tons. The proposed weight scale automobile'southward maximum scale depends on your load cell'south specification. In that location are ranges from 500 gram, 1 Kg, 5Kg, ten Kg, xx Kg and xl Kg etc.
There are unlike grades of load cell, they offer different accuracy range and you should choose the suitable one for your project.
Classification of Load cell Accuracy Class:
The different accuracy classes are defined for dissimilar kinds of applications. The below classification is from everyman accuracy to highest accuracy range.
The load cells with lower accuracy (but reasonably accurate) are classified as D1, C1 and C2. This is enough for this project. These load cells are used for measuring weight of sand, cement or h2o.
C3 form load cell are used in quality assurance such as checking weight of ball bearings, machine constructions parts etc.
C4, C5, C6 are the best in class accuracy, these grades of load cells are used to measure in grams to micrograms. These course classes are used in shop-counter scales, big calibration production monitoring, food packing and laboratory use etc.
Now let'south dive into technical details of the project.
Excursion Diagram:
Load cell connection HX711 to Arduino and load jail cell.
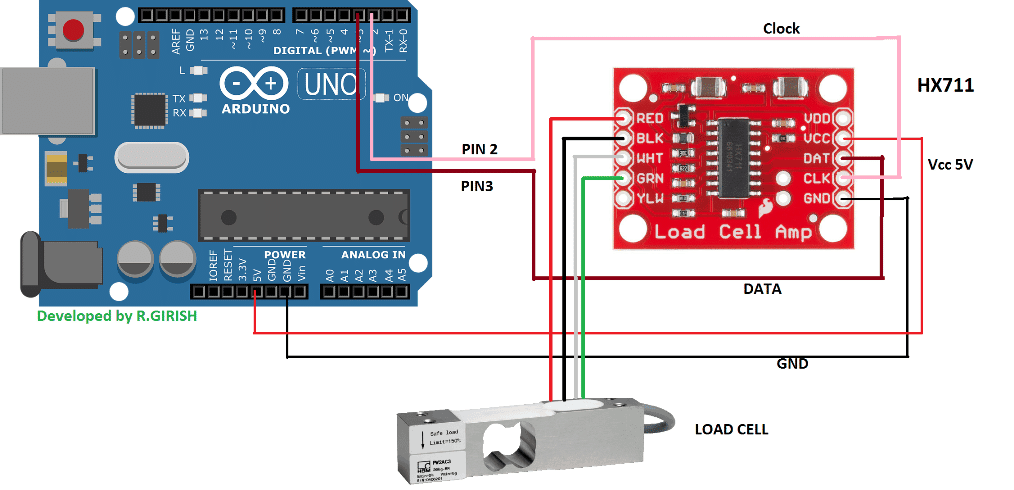
The project consists of Arduino, Load cell and HX711 load cell amplifier board and a reckoner. The output can be monitored on the Series monitor of Arduino IDE.
The brain of the project is as always the arduino, y'all can use whatever Arduino board model. The HX711 is 24 bit ADC, which can observe tiniest flex due to weight on the load cell. It can operate from 2.7 Five to 5 5. The power is provided from Arduino board.
The load jail cell has four wires by and large, which is the output from the Wheatstone bridge configured strain gauge.
The Scarlet wire is E+, black wire is East-, green wire is A- and white wire is A+. Some HX711 modules specify the proper noun of the terminals of load cell and some HX711 modules specify the colours of the wires, such a model is illustrated in the circuit diagram.
The Information pin of HX711 is connected to pin #three of Arduino and Clock pin of the HX711 is continued to pin #ii of Arduino.
How to Mount the Load cell:
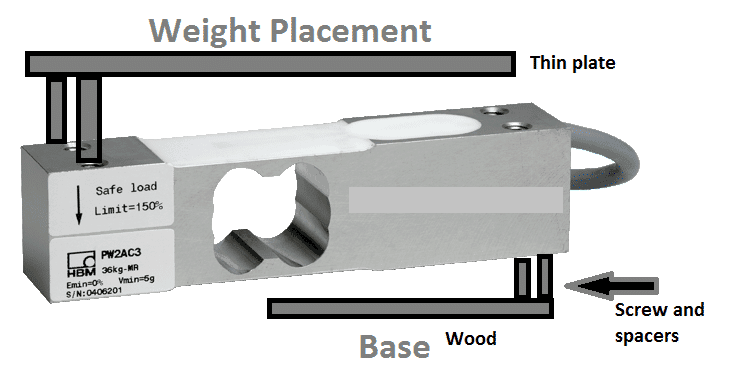
The load cell has four screw holes, two at both sides. Whatever one side must be stationary for all-time accuracy; it may exist mounded to a forest with reasonable weight.
A thin wood or thin plate can be used to concur the measuring weight as illustrated above.
So when yous place a weight, the load cell bend then does the strain gauge and change its resistance which is measured past HX711 module and fed to Arduino.
Once the hardware setup is complete, permit's upload the code and calibrate.
Calibrating the excursion:
There are two programs; one is the calibration program (finding the calibration factor). Another lawmaking is weight measurement plan, the calibration factor found from the scale plan lawmaking need to be entered in weight measurement plan.
The calibration factor determines the accuracy of the weight measurement.
Download the HX711 library here: github.com/bogde/HX711
Calibrations Program code:
//-------------------- --------------------//
            #include <HX711.h>
            const int out = iii;
            const int clck = ii;
            HX711 scale(out, clck);
            bladder CalibrationFactor = -96550;
            char var;
            void setup()
            {
            Serial.begin(9600);
            Series.println("------------- Weight Scale Scale --------------");
            Series.println("Press Q,W,Eastward,R or q,w,due east,r to increase calibration factor by 10,100,1000,10000 respectively");
            Serial.println("Press A,S,D,F or a,due south,d,f to decrease scale factor by 10,100,1000,10000 respectively");
            Series.println("Press 'T' or 't' for tare");
            scale.set_scale();
            scale.tare();
            long zero_factor = scale.read_average();
            Serial.print("Zero factor: ");
            Serial.println(zero_factor);
            }
            void loop()
            {
            scale.set_scale(CalibrationFactor);
            Serial.impress("Reading: ");
            Serial.print(calibration.get_units(), 3);
            Series.println(" Kilogram");
            Serial.print("Calibration Factor is: ");
            Serial.println(CalibrationFactor);
            Serial.println("--------------------------------------------");
            if (Serial.available())
            {
            var = Serial.read();
            if (var == 'q')
            {
            CalibrationFactor = CalibrationFactor +  10;
            }
            else if (var == 'a')
            {
            CalibrationFactor = CalibrationFactor - 10;
            }
            else if (var == 'w')
            {
            CalibrationFactor = CalibrationFactor +  100;
            }
            else if (var == 's')
            {
            CalibrationFactor = CalibrationFactor - 100;
            }
            else if (var == 'e')
            {
            CalibrationFactor = CalibrationFactor +  1000;
            }
            else if (var == 'd')
            {
            CalibrationFactor = CalibrationFactor - thousand;
            }
            else if (var == 'r')
            {
            CalibrationFactor = CalibrationFactor +  10000;
            }
            else if (var == 'f')
            {
            CalibrationFactor = CalibrationFactor - 10000;
            }
            else if (var == 'Q')
            {
            CalibrationFactor = CalibrationFactor +  10;
            }
            else if (var == 'A')
            {
            CalibrationFactor = CalibrationFactor - 10;
            }
            else if (var == 'W')
            {
            CalibrationFactor = CalibrationFactor +  100;
            }
            else if (var == 'S')
            {
            CalibrationFactor = CalibrationFactor - 100;
            }
            else if (var == 'E')
            {
            CalibrationFactor = CalibrationFactor +  1000;
            }
            else if (var == 'D')
            {
            CalibrationFactor = CalibrationFactor - k;
            }
            else if (var == 'R')
            {
            CalibrationFactor = CalibrationFactor +  10000;
            }
            else if (var == 'F')
            {
            CalibrationFactor = CalibrationFactor - 10000;
            }
            else if (var == 't')
            {
            scale.tare();
            }
            else if (var == 'T')
            {
            scale.tare();
            }
            }
            }
            //-------------------- --------------------//
How to Calibrate:
- With completed hardware setup upload the above lawmaking.
- Remove the thin plate or wood which is used for holding the weight including the 2 screws (other side of the load cell should be stock-still to a base)
- Open the Serial monitor.
- Place a known weight on the load cell directly, 100 gram (say).
- Press Q, W, E, R to increment calibration gene past ten,100,1000,10000 respectively.
- Press A, South, D, F to decrease calibration cistron by 10,100,yard,10000 respectively.
- Press "Enter" after every increment or decrement of the calibration factor.
- Increment or decrease the calibration factor until the correct weight of known weight textile appears.
- Tare office is to set the weight scale to nil, this is useful when you want to measure weight of water (say) without the weight of the basin. Place the bowl start, press tare and pour the water.
- Annotation the calibration gene and write it down after the know weight appears.
Now information technology tin measure unknown weights.
Weight Measurement Program Code:
//---------------- ----------------//
            #include <HX711.h>
            const int out = 3;
            const int clck = 2;
            HX711 calibration(out, clck);
            float CalibrationFactor = -12000;  // Replace -12000 the calibration factor.
            void setup()
            {
            Serial.begin(9600);
            Serial.println("Press 'T' or 't' to tare");
            scale.set_scale(CalibrationFactor);
            calibration.tare();
            }
            void loop()
            {
            Serial.print("Weight: ");
            Series.print(scale.get_units(), three);
            Serial.println(" Kilogram");
            if (Series.available())
            {
            char var = Series.read();
            if (var == 't')
            {
            scale.tare();
            }
            if (var == 'T')
            {
            calibration.tare();
            }
            }
            }
            //---------------- ----------------//
float CalibrationFactor = -12000;
Supplant -12000 with the calibration factor that you lot constitute. It can exist a negative number or a positive number.
Upload the above code with your full hardware setup and your weight scale machine is set.
Weight Scale Motorcar Using LCD Brandish
The in a higher place commodity explained an Arduino based weighing scale arrangement using your PC, in the following section nosotros will endeavour to build a applied version of Weight scale machine by adding 16 x 2 LCD display, and then that we don't depend on a PC while measuring weights. In this post ii versions are proposed, one with "I2C" sixteen x two LCD and i without "I2C" sixteen 10 2 LCD display.
Here 2 choices are given and so that readers can cull the pattern as per their convenient. The chief difference between the two is wire connections; with I2C adapter module just four wires (Vcc, GND, SCL and SDA) are required for performance of LCD display, whereas without I2C adapter you lot need several wires to connect betwixt the Arduino and LCD display.
Even so both functions exactly the aforementioned; some prefer I2C over conventional one and some adopt the vice versa and so hither are the both designs.
Let's take look at the conventional LCD blueprint:
Circuit diagram:
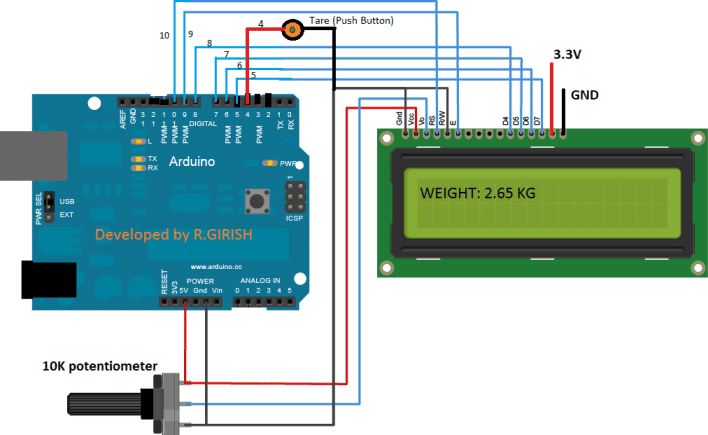
In the above schematic nosotros accept the arduino, 16 x 2 LCD brandish and 10K potentiometer for adjusting LCD display contrast.
3.3 Five can be fed from Arduino to LCD brandish for backlighting. A push button is provided to bring the weight reading to zero, this office volition be explained in detail at the end.
This is just connection between LCD and Arduino, the connection betwixt load cell and load cell amplifier to Arduino is shown in the previous section.
Code for LCD Weight Calibration machine:
// -------- Program developed by R.GIRISH -------//
            #include <LiquidCrystal.h>
            #include <HX711.h>
            const int rs = 10;
            const int en = 9;
            const int d4 = eight;
            const int d5 = 7;
            const int d6 = half-dozen;
            const int d7 = 5;
            LiquidCrystal lcd(rs, en, d4, d5, d6, d7);
            const int out = 3;
            const int clck = ii;
            const int Tare = 4;
            HX711 scale(out, clck);
            float CalibrationFactor = -12000;  // Replace -12000 the calibration factor.
            void setup()
            {
            lcd.begin(16, 2);
            pinMode(Tare, INPUT);
            digitalWrite(Tare, HIGH);
            lcd.setCursor(0, 0);
            lcd.print("  Weight Scale");
            lcd.setCursor(0, 1);
            lcd.print("    Automobile");
            delay(2000);
            scale.set_scale(CalibrationFactor);
            scale.tare();
            }
            void loop()
            {
            lcd.articulate();
            lcd.setCursor(0, 0);
            lcd.print("Weight:");
            lcd.print(scale.get_units(), 3);
            lcd.print(" Kg");
            filibuster(200);
            if (digitalRead(Tare) == Depression)
            {
            calibration.tare();
            lcd.articulate();
            lcd.setCursor(0, 0);
            lcd.print("Tare ......");
            lcd.setCursor(0, 1);
            lcd.impress("Setting to 0 Kg.");
            delay(1000);
            }
            }
            // -------- Program adult by R.GIRISH -------//
At present let's come across how to utilise this weight scale machine with I2C adapter based LCD display.
Excursion Diagram Arduino and LCD display with I2C adapter :
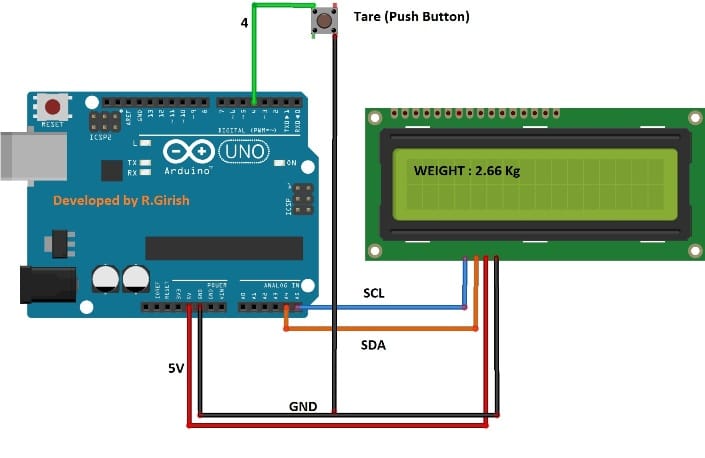
Here nosotros just accept an Arduino and LCD display with I2C adapter on the back. Now the wire connections are simplified and straight forwards.
Illustration of I2C module:
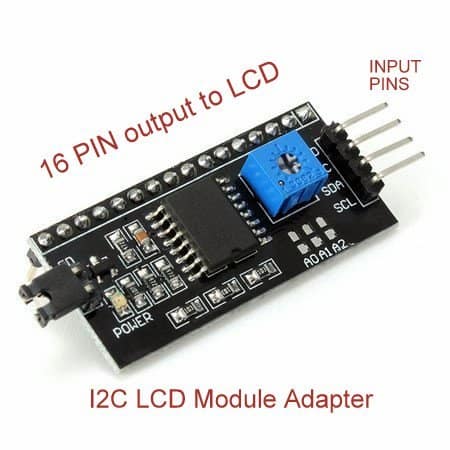
This module can be soldered directly on the back of a normal xvi ten 2 or even twenty x 4 LCD display and follow the schematic diagram.
And again delight refer the previous section for connexion of load cell, load prison cell amplifier and Arduino.
Download the following Library for I2C based:
github.com/marcoschwartz/LiquidCrystal_I2C
github.com/PaulStoffregen/Wire
Code for I2C based Weight scale circuit:
// -------- Program developed by R.GIRISH -------//
            #include <LiquidCrystal_I2C.h>
            #include<Wire.h>
            #include <HX711.h>
            const int out = 3;
            const int clck = 2;
            const int Tare = 4;
            HX711 scale(out, clck);
            float CalibrationFactor = -12000;  // Supersede -12000 the scale factor.
            LiquidCrystal_I2C lcd(0x27, 16, 2);
            void setup()
            {
            lcd.init();
            lcd.backlight();
            pinMode(Tare, INPUT);
            digitalWrite(Tare, HIGH);
            lcd.setCursor(0,0);
            lcd.print("  Weight Scale");
            lcd.setCursor(0,1);
            lcd.print("    Motorcar");
            delay(2000);
            scale.set_scale(CalibrationFactor);
            scale.tare();
            }
            void loop()
            {
            lcd.clear();
            lcd.setCursor(0,0);
            lcd.print("Weight:");
            lcd.print(scale.get_units(), 3);
            lcd.print(" Kg");
            delay(200);
            if (digitalRead(Tare) == LOW)
            {
            scale.tare();
            lcd.clear();
            lcd.setCursor(0,0);
            lcd.print("Tare ......");
            lcd.setCursor(0,1);
            lcd.print("Setting to 0 Kg.");
            delay(1000);
            }
            }
            // -------- Plan developed by R.GIRISH -------//
Note:
You should enter the calibration factor in the code before you uploading either of the code to Arduino.
float CalibrationFactor = -12000;
Obtaining calibration factor is explained in i the previous section above.
Tare function:
Tare function in a weight scale is to bring the readings to goose egg. For example if we accept a handbasket in which the appurtenances are loaded, then the net weight will be weight of the basket + weight of the goods.
If we press tare button with handbasket on the load cell earlier loading appurtenances, the weight of the basket volition be neglected and we can measure the weight of the appurtenances alone.
If you lot take any questions regarding this Arduino based applied LCD weighing calibration machine circuit, delight limited in the comment section you may get a quick reply.
Source: https://www.homemade-circuits.com/weighing-scale-circuit-using-load-cell-and-arduino/
Post a Comment for "My Digital Scale Reads Offff When I Tare"